Animation Challenge Tutorial
This short tutorial is aimed at intermediate Blender users. I want to talk about animation and will only briefly mention how to add key-frames in Blender etc. This tutorial can also be found at www.blenderartists.org/forum, one of the central Blender community sites.
RIG
Make sure you’ve downloaded the FANTASTIC rig by Kiopaa (@Blenderartists). http://blenderartists.org/forum/attachment.php?attachmentid=62699&d=1233...
The files are provided under the Creative Commons Attribution 3.0 ( http://creativecommons.org/licenses/by/3.0/ ) license.
THE CHALLENGE
The challenge is to simply animate the character provided from one pillar to another. But to make your entry interesting you need an idea.

IDEA
When given a simple challenge like this, there are going to be lots of entries that will look very similar. So you need an idea to make your animation stand out. The best way to get an idea going is to think of a situation or an event, rather than an action. Make your idea a situation and this will cause the character to react. This will result in much more realistic actions. My idea was to simply make the platforms bendy. The character discovers this while leaning across to the other platform. He then improvises a solution with mixed results. Once I had thought of the situation it was easy and fun to work out how the character would react.
ACT LIKE AN IDIOT
Now you have an idea in your head but what should you do next? During this planning stage I actually like to rehearse my character’s actions for real. It really does help to act like an idiot and find out how your character would react in your situation/idea. So I stood on a chair and imagined I was trying to get to another. Even though I wasn’t able to perform the actions I wanted (if I tried I would have fallen off ), I was able to understand what the character would be feeling. You can do this with a camera if you like and act out the scene. Just make sure nobody is watching :)
BLOCKING
This is the most important part of the animation process. Blocking is a set of key-poses that can fully explain the idea that you’re trying to animate. I didn’t save my blocking pass but an early save of my animation (just after blocking) can be found here: http://www.vimeo.com/3794274 .
Start by making sure you organise your interface to include a timeline. Hit the Auto-Key button and start to set your poses.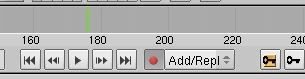 This fantastic rig allows for both IK and FK movements. I used IK animation for most of the scene, the only time I switched to FK was for when his arms were stretched out, reaching for the other platform. Switching made that section a lot easier.
You can be as detailed as you like in your key-poses but your goal must be to get the right timing together. Don’t worry too much about detailed facial expressions or finger/toe movement, just concentrate on key actions and poses. Once you’ve blocked out your scene, have a look at what you’ve got and decide what needs changing. Blocking allows you to chance the actions and timing easier. Without blocking out your scene you might find you’ve made a mistake and aren’t able to make changes easily.
FINALIZING
You may not believe it but you’re nearly finished! Finalizing the animation now should simply be a matter of adding detail to in-between key pose frames. If you’ve done a proper blocking stage then this should be very easy.
The best way to make sure you have a nice smooth accurate animation is to make sure you have clean IPO curves. Use the curve controls to their full extent, rather than adding extra key-frames. Open the IPO Curve Editor and experiment with the different Handle types of your curves. Open the handle types in the 'Point' menu of the IPO editor. Here you can see the effect of clean IPOs on a simple bouncing ball animation.
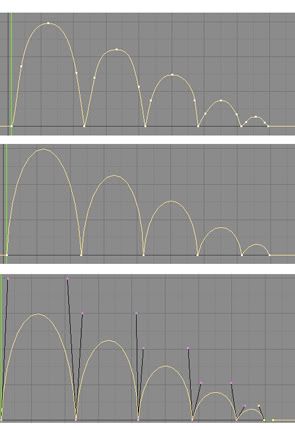 If you keep your IPO's clean and fully use the correct handle types, your animation will be far more accurate.
Once you’re happy with the extra detail, you can start work on the facial animation. Here you may want to refer back to your ‘Act like an idiot’ stage, and get a mirror to accurately reproduce the right expressions.
RIG
Make sure you’ve downloaded the FANTASTIC rig by Kiopaa (@Blenderartists). http://blenderartists.org/forum/attachment.php?attachmentid=62699&d=1233...
The files are provided under the Creative Commons Attribution 3.0 ( http://creativecommons.org/licenses/by/3.0/ ) license.
THE CHALLENGE
The challenge is to simply animate the character provided from one pillar to another. But to make your entry interesting you need an idea.

IDEA
When given a simple challenge like this, there are going to be lots of entries that will look very similar. So you need an idea to make your animation stand out. The best way to get an idea going is to think of a situation or an event, rather than an action. Make your idea a situation and this will cause the character to react. This will result in much more realistic actions. My idea was to simply make the platforms bendy. The character discovers this while leaning across to the other platform. He then improvises a solution with mixed results. Once I had thought of the situation it was easy and fun to work out how the character would react.
ACT LIKE AN IDIOT
Now you have an idea in your head but what should you do next? During this planning stage I actually like to rehearse my character’s actions for real. It really does help to act like an idiot and find out how your character would react in your situation/idea. So I stood on a chair and imagined I was trying to get to another. Even though I wasn’t able to perform the actions I wanted (if I tried I would have fallen off ), I was able to understand what the character would be feeling. You can do this with a camera if you like and act out the scene. Just make sure nobody is watching :)
BLOCKING
This is the most important part of the animation process. Blocking is a set of key-poses that can fully explain the idea that you’re trying to animate. I didn’t save my blocking pass but an early save of my animation (just after blocking) can be found here: http://www.vimeo.com/3794274 .
Start by making sure you organise your interface to include a timeline. Hit the Auto-Key button and start to set your poses.
 This fantastic rig allows for both IK and FK movements. I used IK animation for most of the scene, the only time I switched to FK was for when his arms were stretched out, reaching for the other platform. Switching made that section a lot easier.
 You can be as detailed as you like in your key-poses but your goal must be to get the right timing together. Don’t worry too much about detailed facial expressions or finger/toe movement, just concentrate on key actions and poses. Once you’ve blocked out your scene, have a look at what you’ve got and decide what needs changing. Blocking allows you to chance the actions and timing easier. Without blocking out your scene you might find you’ve made a mistake and aren’t able to make changes easily.
FINALIZING
You may not believe it but you’re nearly finished! Finalizing the animation now should simply be a matter of adding detail to in-between key pose frames. If you’ve done a proper blocking stage then this should be very easy.
The best way to make sure you have a nice smooth accurate animation is to make sure you have clean IPO curves. Use the curve controls to their full extent, rather than adding extra key-frames. Open the IPO Curve Editor and experiment with the different Handle types of your curves. Open the handle types in the 'Point' menu of the IPO editor. Here you can see the effect of clean IPOs on a simple bouncing ball animation.
 If you keep your IPO's clean and fully use the correct handle types, your animation will be far more accurate.
Once you’re happy with the extra detail, you can start work on the facial animation. Here you may want to refer back to your ‘Act like an idiot’ stage, and get a mirror to accurately reproduce the right expressions.


